Tuesday, June 29, 2010

Windsurf day finally!


Finaly got some windsurfing in yesterday after table tennis and dance class. Got to sail all the way to Snake island which is about a three mile sail. Good wind though and the Go board was working well with a 7.9 M sail.
Then went out and bought the drywall for the ceiling and office of the studio. 26 Sheets of drywall, mostly 4 X 10 s but some 4 X 9 s for the walls in the office.
A lot of loading as they had only one helper at Home Depot to load all the drywall and then I had to unload it into the studio with Rob's help.

Monday, June 28, 2010

Insulated Foundation Treatment


Just a little picture to show what the foundation covering looks like after it has been painted.

Rosette in Place


Here is the rosette as it was designed to be installed. This is 1/4 inch proud of the trim with the same width as the trim.
Some will be painted (In the workshop section) and some varnished in the office section.
Next big job is installing the ceiling. It has been hard to find a rainless window to pickup the drywall.

Sunday, June 27, 2010

Making Rosettes

This video shows how I made the 14 rosettes that I needed to complete the trim for the new studio. The tool I used is home-made from a tablesaw shaper cutter (Craftsman) which is mounted on a steel shaft set into a woodturning handle. There are a vast array of these shaper cutters available in a variety of shapes. This one was given to me by Ron (http://sawdustandglass.com/index.html) for completing bowl bottoms.


The process takes less than a minute per rosette. I mounted the rosette on the surface of the window trim in the video but for the other windows I am mounting them only 1/4 inch proud of the trim.
Advantages of using rosettes are the appearance and the ease of installation. (No miters to cut)

Saturday, June 26, 2010

Little surprise in the compost bin


This is what greeted Janet this morning when she went to empty the compost bin. Quite a surprise!

Thursday, June 24, 2010

Before and after shots.


Here is what the space looked like before the garage was built

And this is after. Grass has done well in all the wet weather.

Skylight Update


What the skylight looks like from the outside.


And from the inside now that the well has been completely covered with 1/4 inch plywood. All caulked with white painters caulk.

Garden is coming along too.

Here is what the vegetable patch looks like after the big excavation job.

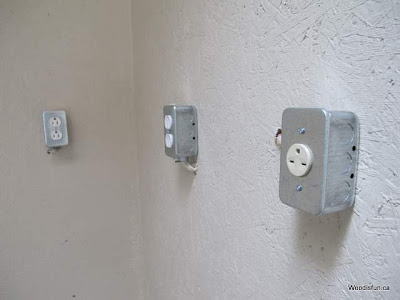
Surface Mount Electrics


What the electrical boxes look like surface mounted in the studio. All at 51 inches high to make for easy access.

Installed a Skylight


This picture is of the skylight with one piece of plywood installed in the well.
Well I got a little help to install a skylight right over the "lathe nook". Does it ever make a difference! Very nice and bright down there now.
I purchased a discontinued model skylight from Home Depot for $50. Also got some sticky one side tar film by Velux. I laid down the film around the opening, applied a bead of roof mastic and set the skylight onto the mastic. Then screwed it down with 1 1/2 #8 deck screws. The skylight was the type that needed no additional flashing but I still applied a layer of the velux film over the edge of the skylight to ensure a waterproof installation.
Certainly no leaks so far and we have had quite a lot of rain since I put it in on Tuesday morning. The worst part of the job was removing the shingles but fortunately the roof is pretty new and the shingles had not set together all that hard.

Saturday, June 19, 2010

Electrics Getting there


Above is what the main electrical panel looked like before it was tidied up a bit.


All wiring will be external so the wires simply project out of the OSB wall panels like the ones above. This way all the wall piercings are easily sealed tight. Sealing inset electrical boxes is much more involved.


Here is an electrical box all taped over for painting.


And the main panel is looking a lot neater now.

Friday, June 18, 2010

The Lathe Nook


This is what the skylight well looks like which will be directly over the "lathe area" nook.


Here is the lathe nook. My plan is to curtain this off with plastic - floor to ceiling. Install the dustcollection system outside the "nook" so that I create negative pressure within the nook to keep the dust from polluting the rest of the work area.
The wires protruding from the walls are outlets to be installed - more about that in my next blog.

Wednesday, June 16, 2010

Foundation Covering Treatment

These pictures show how the exposed foundation wall, which is proud of the main stud wall covered with styrofoam insulation to make it even further outstanding has been covered. I used 4 inch wide by 1 5/8 inch thick spruce lumber with a recess cut on one side to top the covering and OSB to cover the sides. The OSB is glued against the styrofoam. Since the floor of the workshop is slightly sloped to the door the OSB had to be cut to fit. The spruce lumber was toenailed with screws to the walls.


Tuesday, June 15, 2010

OSB interior


Here is what it all looks like with the OSB sheathing in place on the interior. Sorry about the mess but it is a work in progress. Next step is to cap and cover the blue foam at the bottom of all exterior walls.
The framed walls are 8 feet tall but since I wanted and interior height of 9 feet I allowed the foundation walls to stand a foot proud of the floor. This technique allows for simpler construction as all panels are precut to 8 foot. However it does mean that i have to spend a little extra time covering the foundation walls. I had kept 2 inch foam panels against the foundation walls which are now solidly held by the floor. So I am using foam adhesive to keep the OSB covers in place over the foam.

Monday, June 14, 2010

Ventilation for the Studio


This picture shows how I have used a furnace fan (in the center box) to draw air out of the studio. This was important to do while I had easy access to the attic space. On the right is a box with a one way valve installed. The valve is made of styrofoam insulation so that it will keep the heat in when the fan is turned off. On the left is the air direction box which takes the outbound air and directs it to the roof vents.
The switch for this fan will be located near the entrance door.

A Little Room on the Side


Here is the "office" room with its OSB (Aspenite) covering.


And without OSB covering. This small room has two windows and should be a nice little retreat from the "workshop" mess. My wife has claimed this room so it will HAVE to be kept neat and tidy.

Saturday, June 12, 2010

Electrics for the new Studio


This picture shows some of the wires leading to the breaker box. I have purchased most of the breakers.
I have two 30 amp 220 V breakers and three 15 Amp 110Vs.
Still to get is one 20 Amp 110V. Since I do not have the wire for that I have put it off. I will install only one of these.
Well I should be able to hook up the wires after the weekend and see what it looks like once it is organized a bit more.

Friday, June 11, 2010

Inside the Studio


Lined the inside with "aspenite" flake board. Strong enough to hang stuff. I will paint it later.

Wednesday, June 9, 2010

Inside before lining


The walls are 2 X 6 and the roof trusses 2 X 4.
The inside will be insulated with fiberglas pink.
In the rafters I have installed a used furnace fan to draw air out of the inside space and blast it up through the roof vents.